The Redirect URL integration sends users from your web or mobile app to an Incode-hosted verification flow. Incode manages the verification UI and infrastructure; your app manages the redirect and result handling.
There are two sub-patterns depending on whether you need the user to return to your app after verification:
- Redirect only: Your app redirects the user to the Incode-hosted flow. Results are retrieved server-side via webhook or API. The frontend doesn't need to handle a return.
- Redirect and back: Your app redirects the user to the flow and receives them back on completion via a
redirectionUrl. The frontend handles the return and uses the session reference to trigger result fetching.
Both patterns work across web and mobile contexts and require a backend to start sessions.
Choosing a sub-pattern
| Redirect only | Redirect and back | |
|---|---|---|
| Frontend handles return | No | Yes |
| Results retrieved by | Backend (webhook or API poll) | Backend, triggered by frontend on return |
redirectionUrl required |
No | Yes |
| Best for | Server-driven flows, async processing | Apps that need to react immediately on return |
Prerequisites
Complete the Dashboard setup steps in Web Integration Overview before starting this integration. These cover creating a Workflow, adding the Data Sharing Consent module, enabling redirect desktop to mobile, and obtaining your API credentials.
If you are using the Redirect and back sub-pattern, ensure you complete the optional Dashboard setup step 4 to set the Redirect URL field in your Workflow settings to your return URL.
Info
Nobackend (simple case)
If you only need to send users through a verification flow and view results in Dashboard, you can share a generic Workflow URL directly without starting a session. This approach does not link sessions to specific users in your system.
Redirect only
Your backend starts a session, generates an onboarding URL, and redirects the user to it. When the session completes, Incode notifies your backend via webhook (or your backend polls for the result). The user does not return to your app via redirect.
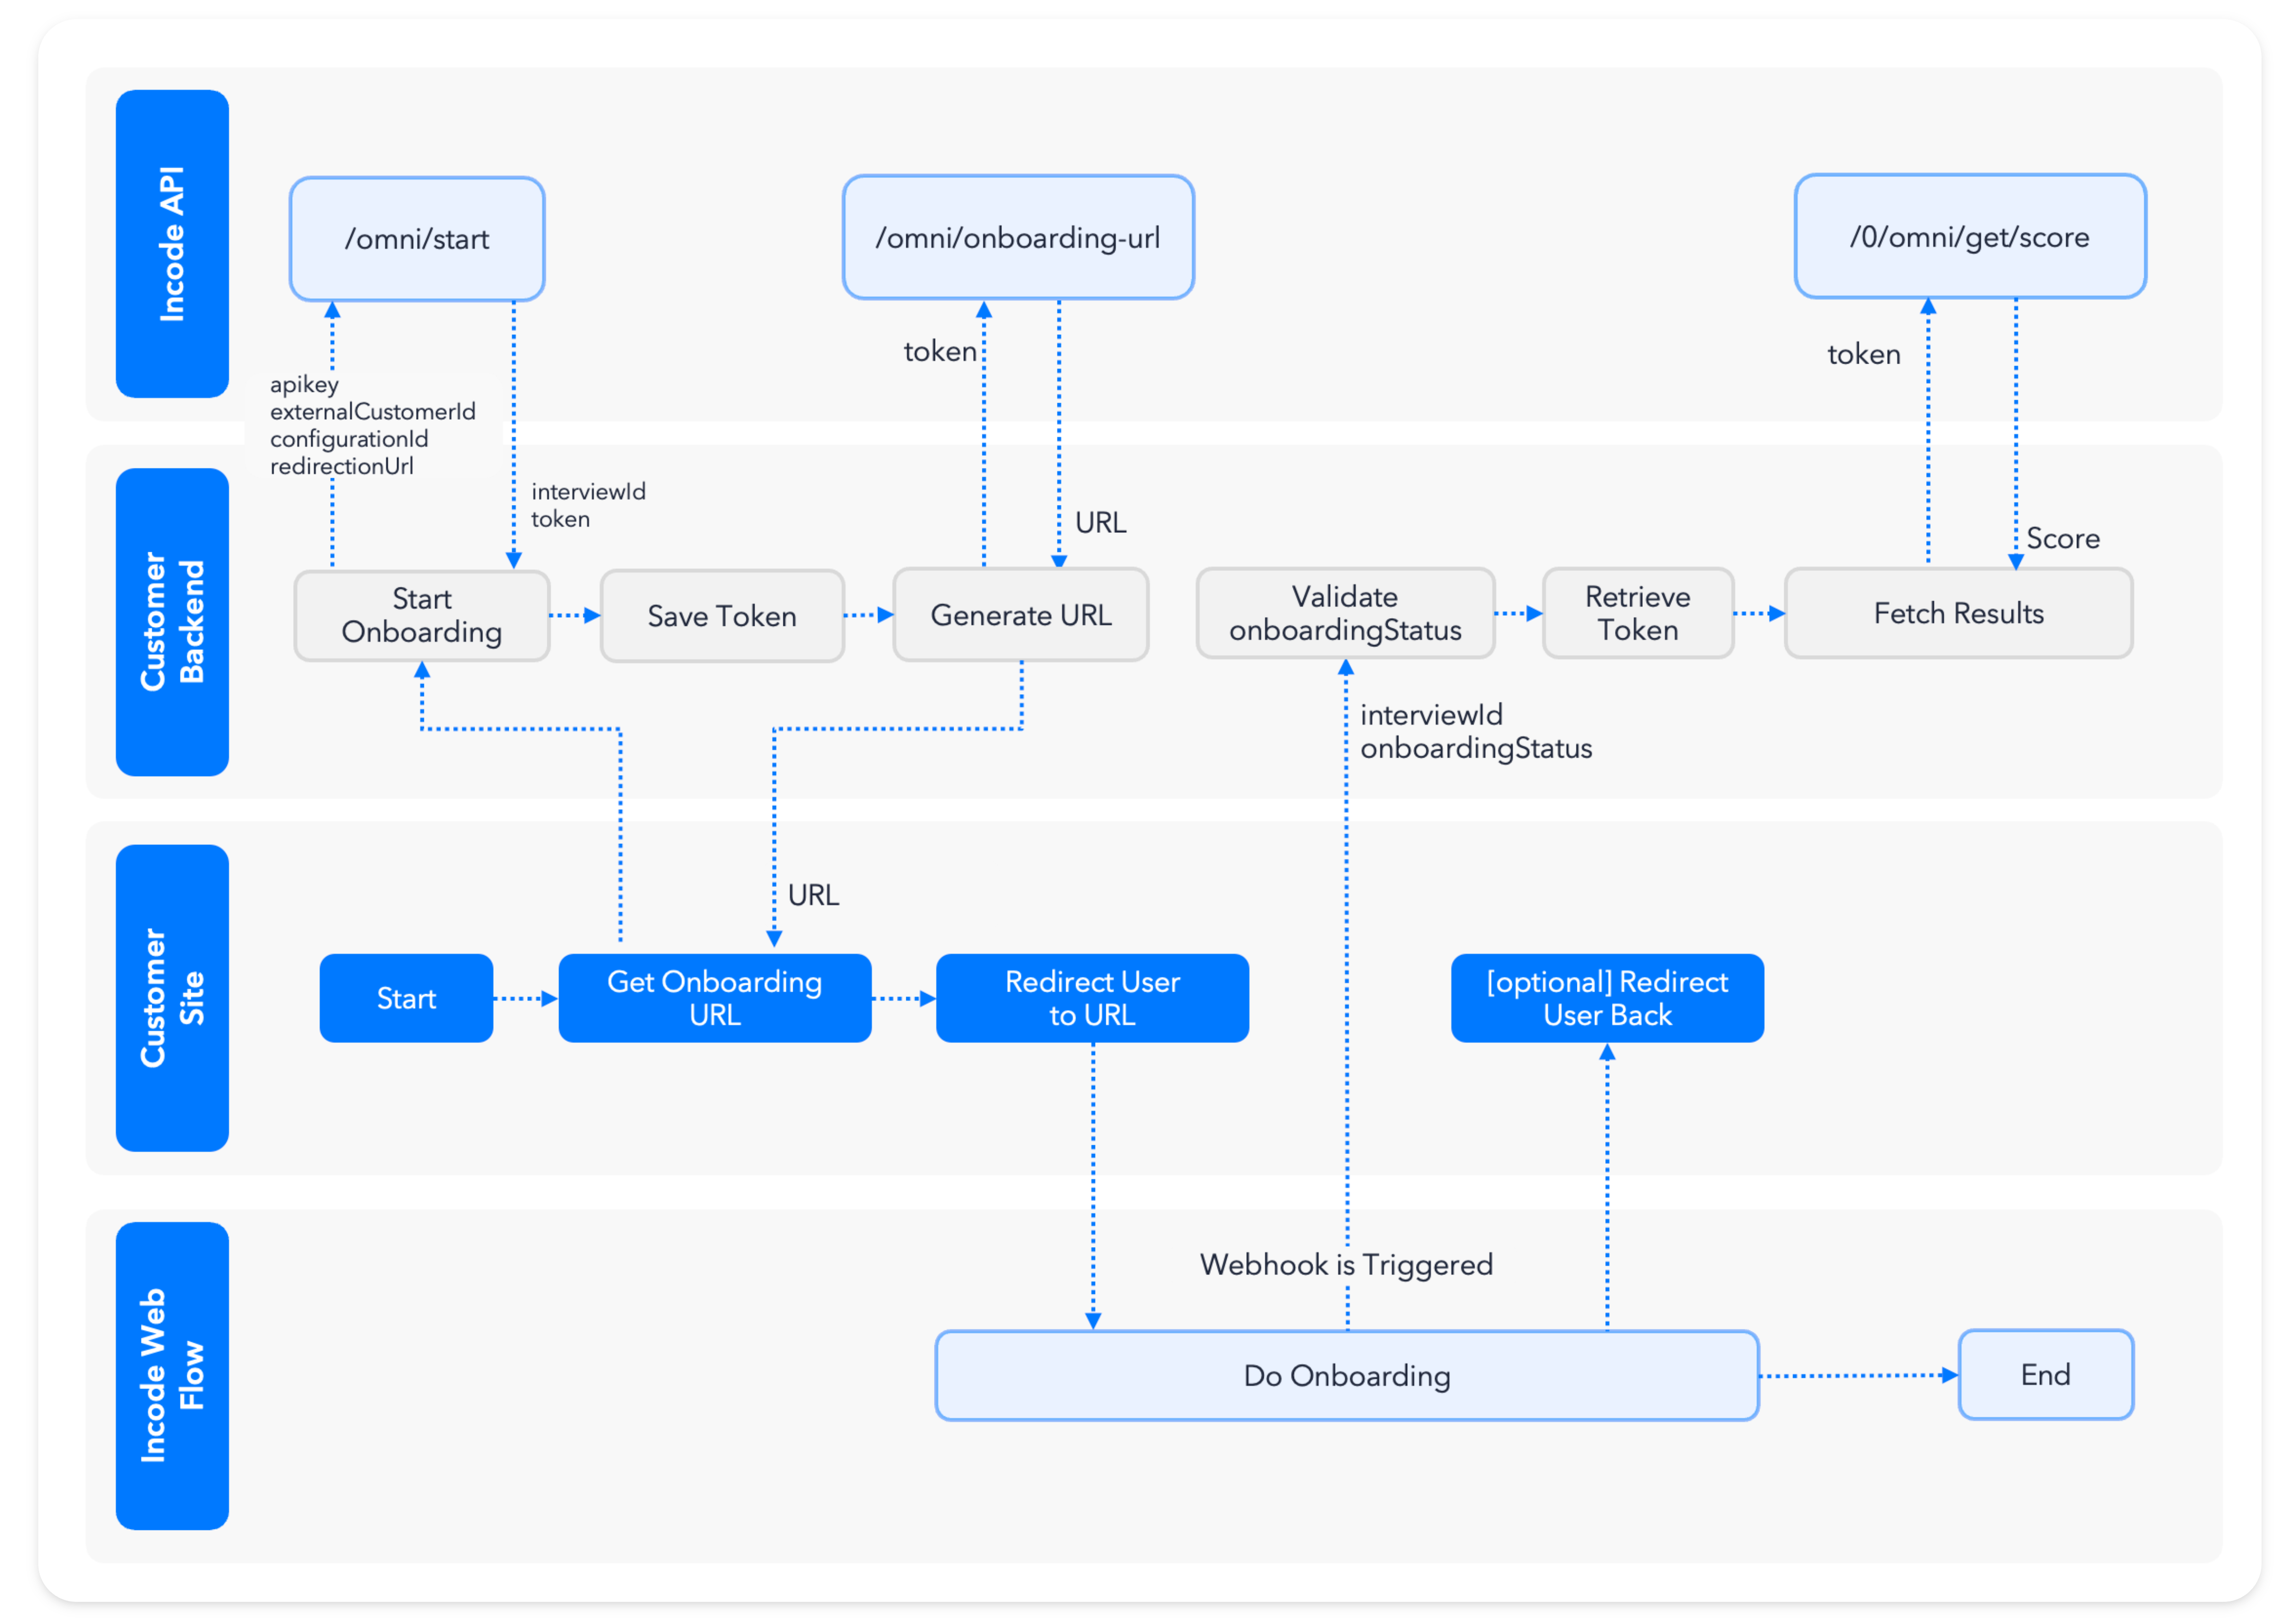
Step 1: Start a session (backend)
Call the Start Onboarding Session endpoint: POST /omni/start.
Request body (key fields):
{
  "configurationId": "YOUR_WORKFLOW_ID",
  "externalCustomerId": "your-user-id"
}
Save the token and interviewId from the response to your database. These are needed later to retrieve results.
Step 2: Generate the onboarding URL (backend)
Call /omni/onboarding-url with the session token:
const response = await fetch(`${API_URL}0/omni/onboarding-url`, {
  method: "GET",
  headers: {
    "Content-Type": "application/json",
    "api-version": "1.0",
    "X-Incode-Hardware-Id": token,
  },
});

const { url } = await response.json();
Step 3: Redirect the user (frontend)
window.location.replace(url);
Step 4: Retrieve results (backend)
Configure an Onboarding Status Webhook or Session Webhooks to receive notification when the session completes, then fetch the results using the interviewId.
Redirect and back
Your backend starts a session with a redirectionUrl set. When the user finishes verification, Incode redirects them back to that URL. Your frontend reads the session reference it stored before the redirect and calls your backend to fetch results.
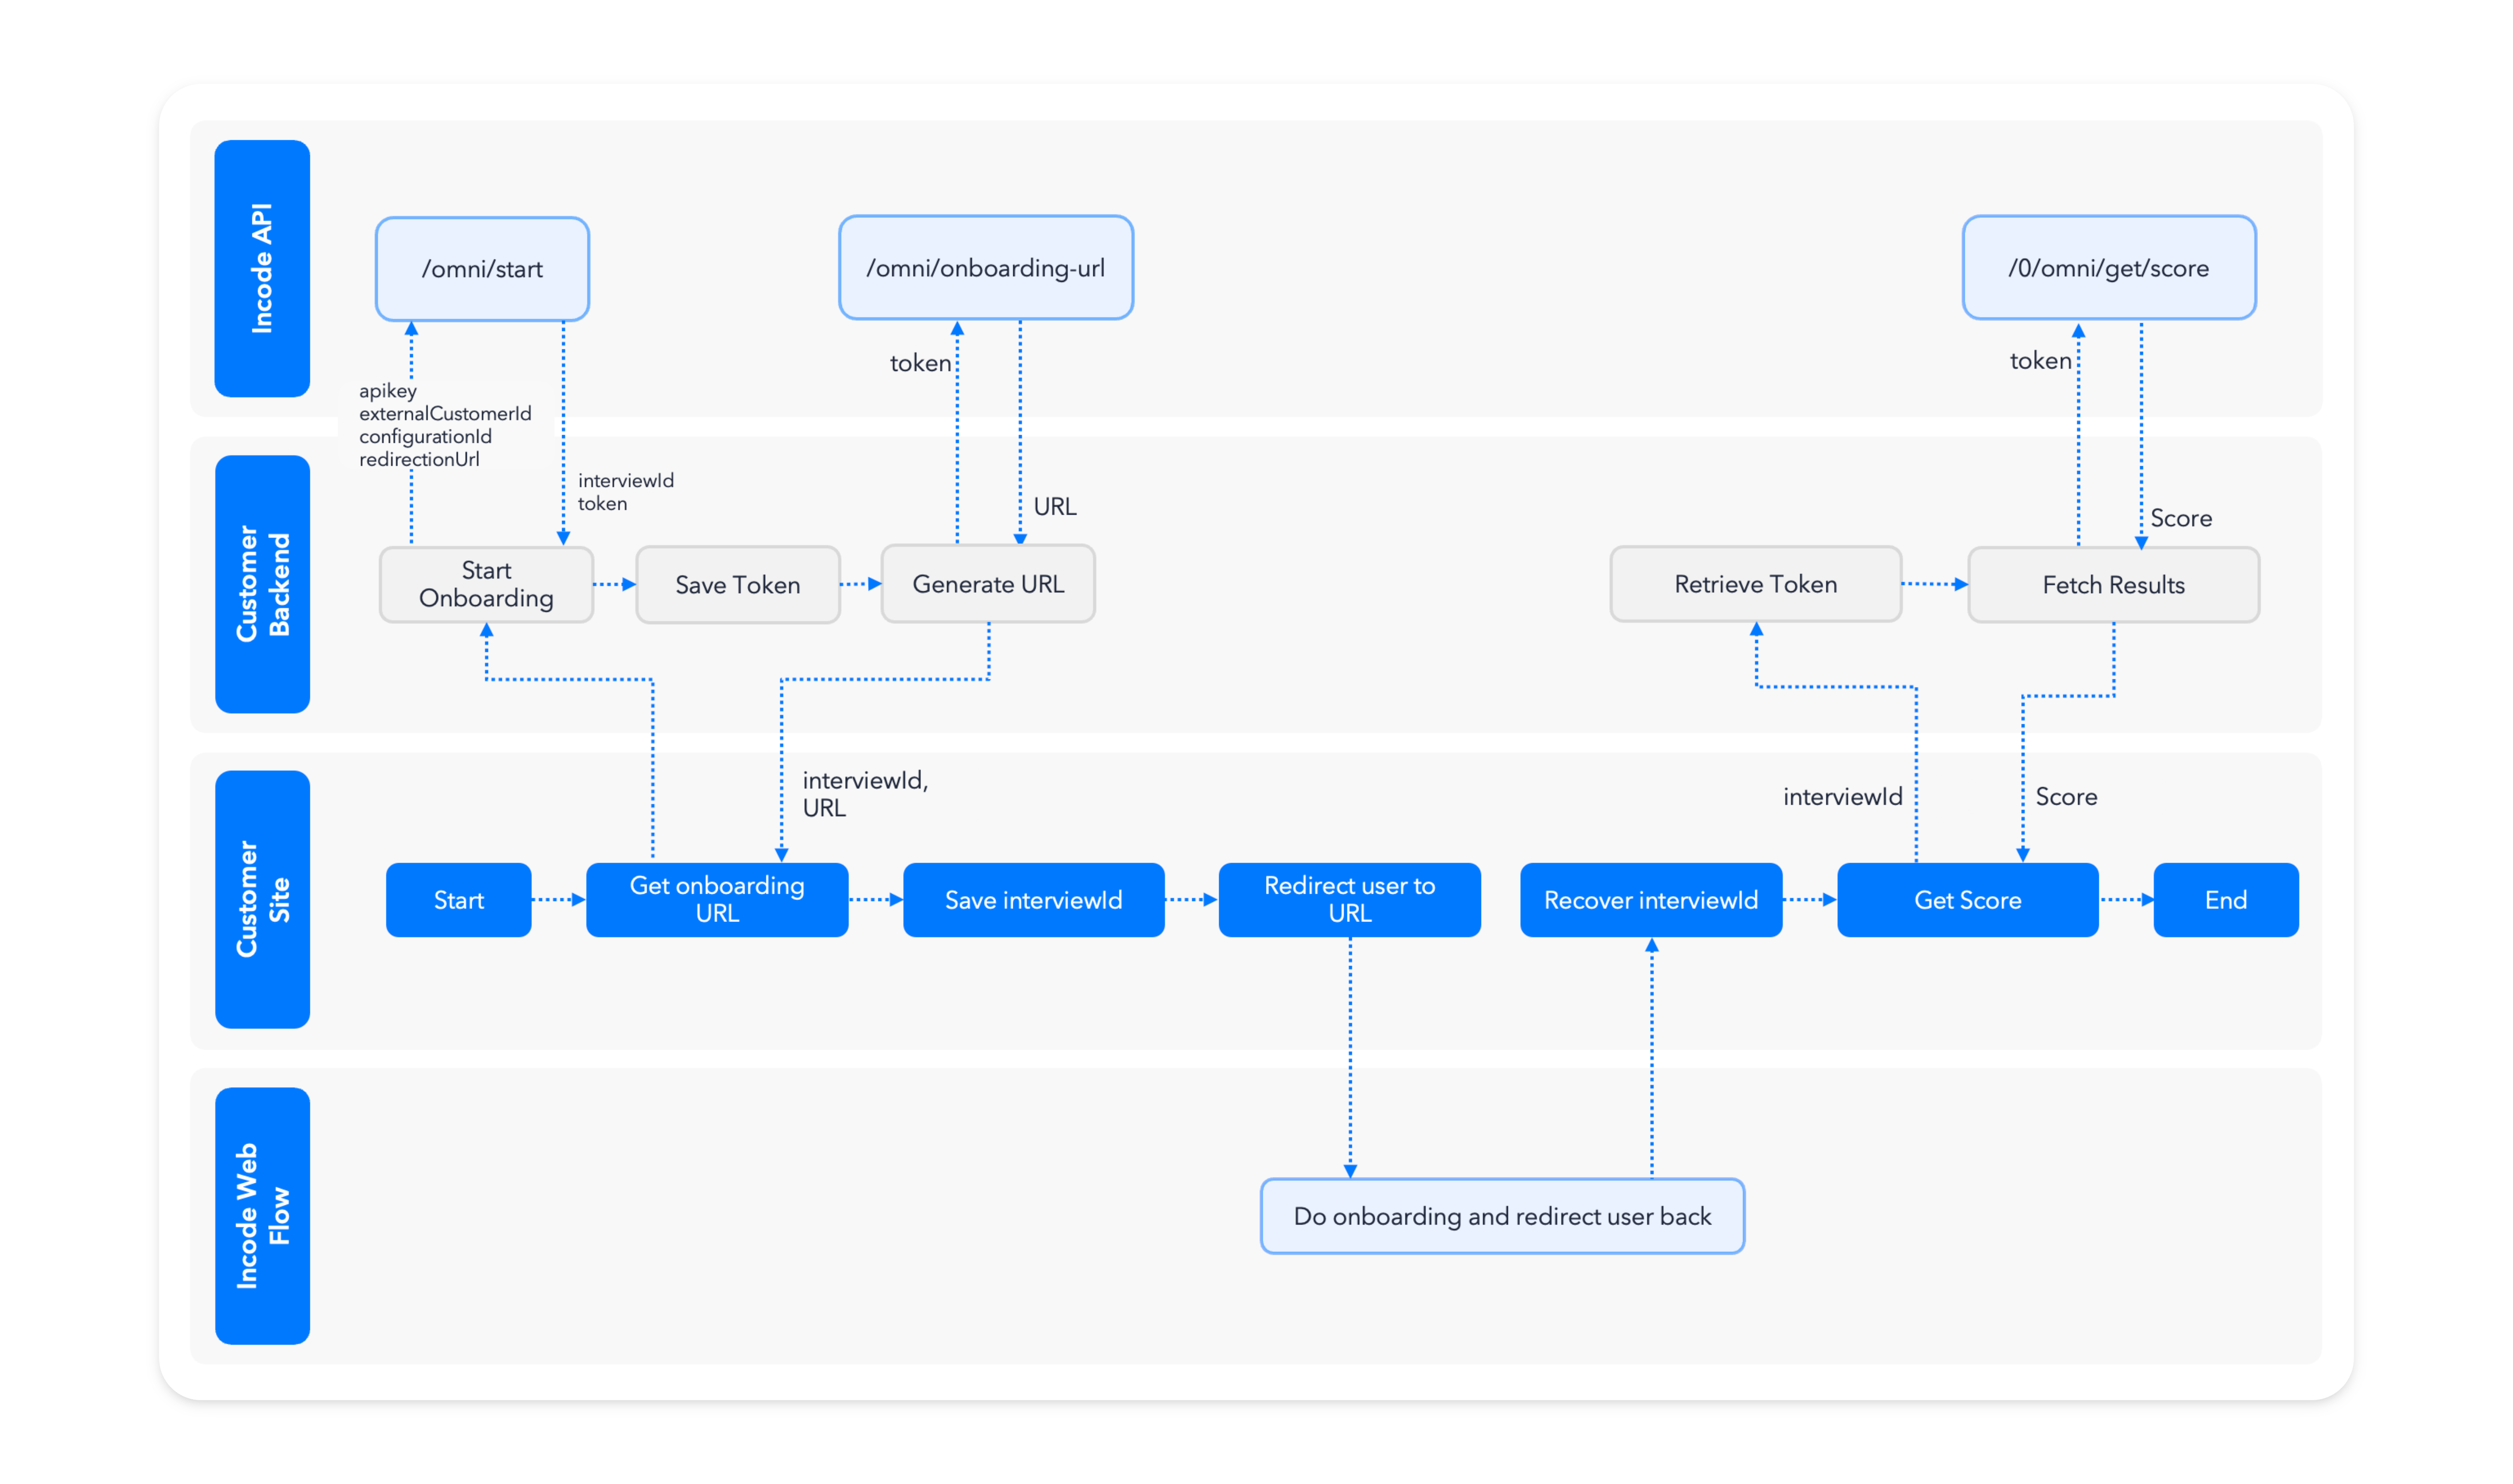
Step 1: Create a session and generate an onboarding URL (backend)
1.1 — Create the session
Call /omni/start with a redirectionUrl:
const params = {
  configurationId: "YOUR_WORKFLOW_ID",
  countryCode: "ALL",
  language: "en-US",
  externalCustomerId: "your-user-id",
  redirectionUrl: "https://yourapp.com/verification-complete",
};

const response = await fetch(`${API_URL}omni/start`, {
  method: "POST",
  headers: {
    "Content-Type": "application/json",
    "x-api-key": "YOUR_API_KEY",
    "api-version": "1.0",
  },
  body: JSON.stringify(params),
});

const { token, interviewId } = await response.json();
1.2 — Save the token and interviewId
Persist the session token and interviewId to your database, associated with your user. You will need these to retrieve results after the session completes.
1.3 — Generate the onboarding URL
Call /omni/onboarding-url with the session token:
const response = await fetch(`${API_URL}0/omni/onboarding-url`, {
  method: "GET",
  headers: {
    "Content-Type": "application/json",
    "api-version": "1.0",
    "X-Incode-Hardware-Id": token,
  },
});

const { url } = await response.json();
The
/0/prefix indicates a zero-configuration endpoint — it only needs the session token and derives all other context from it.
1.4 — Return the URL and interviewId to your frontend
Step 2: Store a session reference in the frontend
Before redirecting the user, save the interviewId so your return page can access it. The return URL will not carry any session information, so the frontend needs its own reference.
const response = await fetch("https://your.backend.app/create-session");
const { interviewId, url } = await response.json();

localStorage.setItem("interviewId", interviewId);
Step 3: Redirect the user
window.location.replace(url);
Step 4: Receive the user back
Create the return page your redirectionUrl points to. When the user lands here after completing verification, retrieve the interviewId from localStorage and call your backend to fetch results.
const interviewId = localStorage.getItem("interviewId");

const response = await fetch(
  `https://your.backend.app/fetch-score?interviewId=${interviewId}`
);
const { status } = await response.json();

if (status === "OK") {
  console.log("Verification passed");
} else {
  console.log("Verification did not pass");
}
Step 5: Fetch results in the backend
Receive the interviewId from the frontend, use it to look up the session token from your database, then call the Incode API to retrieve results.
When to use this approach
Redirect URL (either sub-pattern) is a good fit when:
- You are comfortable sending users to a separate page for verification
- You want minimal front-end code
- You are redirecting from a mobile app's browser or WebView
- You need to send verification links via SMS, WhatsApp, or email (use the URL directly; no redirect logic needed)
If you need users to stay on your domain, consider iFrame instead. If you need full UI control, see Web SDK.