The Forms and Data Entry module presents one or more custom form screens to collect information from a user. You define the questions, their input types, and whether each is required or optional. In Workflows, form responses can be used as conditions to route users to different steps based on their answers.
For an overview of this module and how it works, see Forms and Data Entry.
Supported with:
✅ Workflows | ✅ Flows
Add Forms and Data Entry to Workflows
- In the left menu, click Flow Builder > Workflows.
- Click New or select an existing Workflow.
- From the Modules list, drag and drop the Forms and Data Entry module into the builder.
- You can click the three dots > Edit on the module node to open the Configuration Options panel and adjust settings as needed.
Add Forms and Data Entry to Flows
- In the left menu, click Flow Builder > Flows.
- Click New or select an existing Flow.
- On the Select Modules tab, find the Forms and Data Entry module and click Add.
- You can click Details & Configurations to open the Configuration Options panel and adjust settings as needed.
Configuration Options
This section details all the configuration options available for this module. After changing anything, click Save configurations before closing the configuration panel.
The options you see in your configuration may differ from those documented below. Contact your Incode representative for more information.
Each form is made up of one or more pages. Use the numbered page tabs to switch between pages. Click the plus sign (+) to add a new page. Each page has a different title and can contain one or more questions.
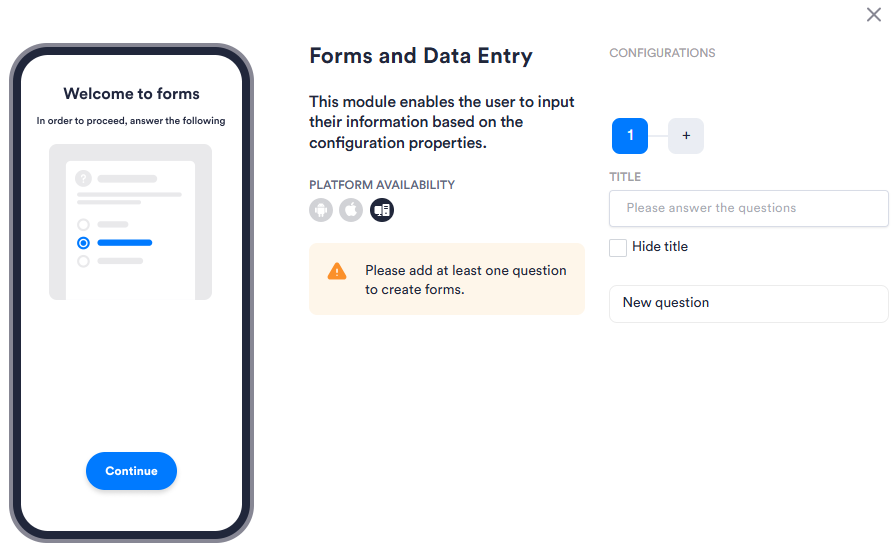
Title
| Setting | Description |
|---|---|
| Title | The title displayed at the top of the form page. Enter the text you want users to see or leave blank to show no title. |
| Hide title | When enabled, hides the title from the form page even if a title is configured. |
Questions
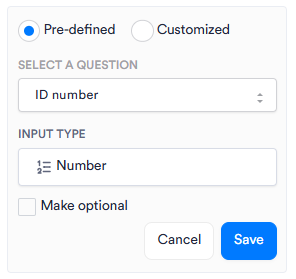
View image of configurable options for pre-defined questions
View image of configurable options for customized questions
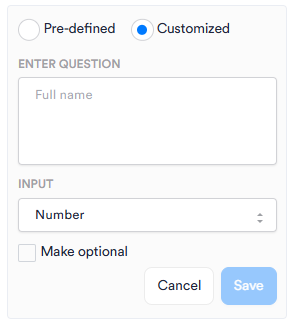
To add a question, click New question. The following settings are available for each question.
| Setting | Description |
|---|---|
| Pre-defined / Customized | Determines whether the question uses a pre-defined template or a custom configuration. Select Pre-defined to choose from a set of common questions with the question text and input type already set. Select Customized to write your own question text and select the input type manually. |
| Select a question Pre-defined only |
The pre-defined question to add to the form. Choose from the available options in the dropdown: ID number, Country of residence, Nationality, Date of birth, Phone number, Email address, CPF, Full name, First name, or Last name. The Input type is set automatically based on the selected question and cannot be changed. |
| Enter Question Customized only |
The custom question text to display to the user. Allows you to manually change the Input type. |
| Input type | The type of input field presented to the user. When using a pre-defined question, this field is read-only. When using a customized question, select the type that matches the data you want to collect: • Text: Free-form text input. • Number: Numeric input. • Date: Date input in DD/MM/YYYY format. Responses are stored as milliseconds since the Unix epoch (UTC). • Country: A searchable drop-down showing full country names. Responses are stored as ISO 3166-1 alpha-3 codes: for example, USA and GBR. • Phone: Phone number input. • Email: Email address input with format validation. • CPF: Document number input formatted for Brazilian Cadastro de Pessoas Físicas (CPF) numbers. • Yes or No: A toggle or drop-down for Boolean responses. • Select: A drop-down for single selection from a defined list of options. |
| Make optional | When enabled, the question is optional and users can proceed without answering it. When disabled, the question is required and Continue remains inactive until the user provides a valid response. |
Click Save after configuring each question. After saving multiple questions, you can drag and drop to reorder them. Click the three dots next to a saved question to edit or delete it.
Info
Tip
Only ask for what you need. Every question adds friction and creates privacy obligations. Remove any question that isn't required for compliance, the user journey, or downstream processing.