# Single Session View
Single Session view contains all the information about an Onboarding or Authentications attempt, including data, captured images, the Flow or Workflow used, and the result.
### Note
The information and images provided on this page are examples. Specific data or details may differ in your configuration.
***
## Enter Single Session View
1. In the left menu, click **Sessions**.
2. Find the Session you want to review. You can [use filters](#filter-sessions) to sort the table.
3. Click a Session to view its details.
***
## Sections
Single Session view contains multiple sections. The sections and information displayed in them depends on the Onboarding Flow or Workflow used for the Session.
### Overview
The section at the top of single Session view shows the user's selfie and the following information:
| Field | Description |
| ---------------------------------- | ----------------------------------------------------------------------------------------------------------------------------------------------------------------------------------------------------- |
| **Workflow **or **Flow** | The name of the Workflow or Flow used for the verification Session. |
| **Session ID** | The unique identifier for the Session. |
| **Session Start** | The date and time the Session began. |
| **Session End** | The date and time the Session ended. |
| **Expired At** | The date and time the Session expired. If the Session has not expired, this field is empty. |
| **Organization** | The organization associated with the Session. |
| **Session Status** | The current status of the Session: _Completed_ or _Not Completed_. |
| **Login Hint** | The `loginHint` identifier tied to the Session at creation time: for example, an email address. It connects the user to the Session, even after personally identifiable information (PII) is deleted. |
| **Total Score** | The overall verification result for the Session: _Pass_ or _Fail_. |
### Workflows
The Workflows tab shows the user's progression through the Workflow, including:
- The time they started the Workflow
- Each module they completed
- The conditions they met or did not meet
- The time they completed the Workflow
- The Workflow result, if the user completed the Workflow
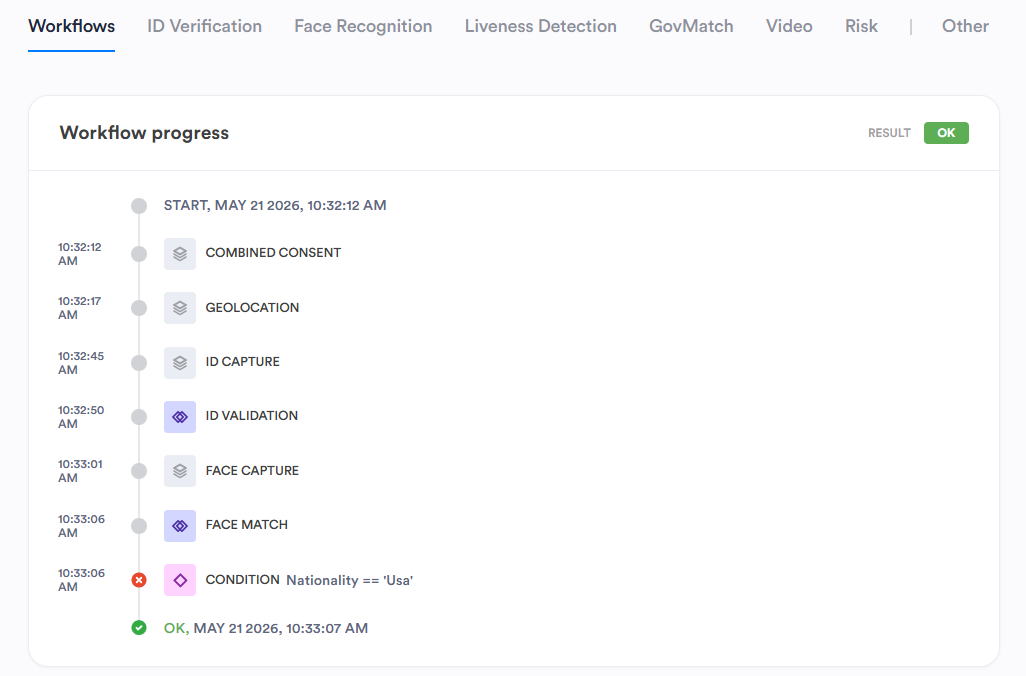
This tab does not appear if the session used a Flow.
### ID Verification
The ID Verification tab includes three sections:
- **ID Verification**: Shows the ID verification tests performed and the result of each. At the top, it indicates the total ID verification score and the severity used when calculating that score. Severity controls how strongly failed ID checks deduct points from the total score by applying a multiplier to the checks’ weights:
- **Conservative**: Multiplier 1.0 (strictest; full deduction)
- **Medium**: Multiplier 0.7
- **Relaxed**: Multiplier 0.5 (more lenient)
- **Soft**: Multiplier 0.0 (failed checks don’t impact the score)
{/* Is the above internal information we don't want to include in a public help site? */}
- **ID OCR**: Shows the data extracted from the ID using [Optical Character Recognition (OCR)](https://developer.incode.com/docs/glossary#ocr), including data extracted from the [Machine-Readable Zone (MRZ)](https://developer.incode.com/docs/glossary#mrz). The total score at the top estimates the accuracy of the OCR-extracted ID data.
- **Capture Attempts**: Shows how many attempts the user took to capture their ID and selfie. Expand each section to see the photo the user took.
For digital IDs, the ID Verification tab displays a "Digital ID" badge, and a placeholder appears in place of the captured document image.
### Face Recognition
The Face Recognition tab compares the user's selfie and ID photo. It shows the results of checks for face masks, lenses, closed eyes, and hats, if configured in the Workflow. It also shows the results of brightness and image quality checks. The total score at the top indicates how confident Incode is that the selfie and ID photo match.
### Face Authentication
The Face Authentication tab shows the results of matching a user's selfie against faces already enrolled in the system, rather than against a single ID photo. It displays the authentication mode, [1:1](https://developer.incode.com/docs/glossary#11-face-authentication) or [1:N](https://developer.incode.com/docs/glossary#1n-face-authentication), and any login hint used to narrow the search. Each attempt lists its outcome, the Face Recognition checks configured in the Flow or Workflow, and a side-by-side comparison of the selfie against the closest matching enrolled face. If Deepsight is enabled, the tab also shows trust indicators for behavior, device, and camera, along with multi-modal Intelligence scores for physical and digital liveness and evasion attempts.
### Liveness Detection
The Liveness Detection tab shows the Session's liveness scores. Liveness detection confirms that a selfie was captured from a live person rather than from a photo, video, or synthetic image. Depending on how the Workflow is configured, the tab can show up to three scores:
- **Physical Check**: Confidence that the selfie is not a mask or printed photo
- **Digital Check**: Confidence that the selfie is not a screen replay or injected video
- **Evasion Check**: Confidence that there was no attempt to bypass detection
If [Deepsight](https://developer.incode.com/docs/deepsight) is enabled, the Deepsight tab appears instead.
### Deepsight
The Deepsight tab shows [Deepsight](https://developer.incode.com/docs/deepsight) results for the Session, including the signals and checks used to detect sophisticated fraud such as injection and deepfake attacks. It includes three sections:
- **Multi-Modal Intelligence (MMI)**: Deepsight's core detection results, broken down by attack category. Only checks enabled in the Flow or Workflow appear as active results. Checks that weren't enabled appear as not applicable.
- **Trust Checks**: Higher-level trust signals summarized as pass/fail results, grouped into three categories:
- Device trust
- Behavior trust
- Camera trust
- **Media**: Deepsight-related media, including selfie videos and direct video links. You can also view all capture attempts, which is useful for investigation.
### Risk AI Shadow
The Risk AI Shadow tab shows what [Risk AI Agent](https://developer.incode.com/docs/risk-ai-agent) would have presented as the AI-generated risk assessment for the Session. It includes four sections:
- **Risk Assessment Summary**: The overall fraud confidence level for the Session.
- **Primary Risk Drivers**: The checks that materially increased the risk score, along with their severity and deviation from expected patterns.
- **Mitigating Considerations**: The checks that showed stabilizing characteristics. This section notes when their impact was insufficient to offset the risk drivers.
- **Overall Determination**: The combined effect of all signals into a final fraud classification.
This tab only appears if you have **_Risk AI Agent Shadow Mode_** enabled for the Flow or Workflow for the Session.
### GovMatch
The GovMatch tab shows government-source verification results for the Session. It includes three sections:
- **Summary**: The overall GovMatch score and the provider used. If the check couldn't run, an error code appears here.
- **Data Match**: A field-level comparison of the Session's captured ID data against government database records, plus a Data Match score.
- **Face Match**: A comparison of the Session's selfie against the government database portrait, plus a Face Match score. This section only appears when the provider supports face comparison.
If GovMatch is running in shadow mode, a banner indicates that results don't affect the session's Total Score.
### Video
The Video tab displays recordings captured during the Session. It includes two sections:
- **Video Selfie**: Appears for Video Selfie Sessions. Shows pass/fail results for basic recording checks, including:
- File is present
- Video track is present
- Audio track is present
- File is not empty
- **Recordings**: Video recordings from ID Capture and Face Capture. You can view and download these recordings. If recordings aren't enabled for the Session's Flow or Workflow, or weren't successfully uploaded, the tab may be empty.
If [Deepsight](https://developer.incode.com/docs/deepsight) is enabled, Deepsight-captured video appears in the Deepsight tab instead.
### Business
The Business tab only appears if the [eKYB](https://developer.incode.com/docs/ekyb) or [Business Watchlist](https://developer.incode.com/docs/business-watchlist) modules ran during the Session. It displays different information, depending on which module ran:
- **eKYB results**: Business identity details (name, address, registration/tax identifier, registration status) and verification outcomes (name, address, city, postal code matches). May also include owners, UBOs, and directors.
- **Business Watchlist results**: Business-specific sanctions and PEP screening results.
### Risk
The Risk tab shows fraud and risk signals for the Session that fall outside standard ID and face verification scores. It includes the following sections:
- **Watchlist**: Potential matches against watchlist entries, when a Watchlist module is enabled for the Flow or Workflow. If a user matched any entry in the watchlist, the specific field that triggered the match is indicated. If no results appear, the module may not have run or returned no matches.
You can add a user to a watchlist in single Session view. Click the three-dot menu (**⋮**) in the top right and select **Allowlist** or **Blocklist**. A new watchlist entry is created by extracting data from session.
- **Risk Signals**: Device and network risk signals, including device reputation, bot level, VPN/proxy likelihood, emulator detection, OS anomaly, remote software level, incognito mode, and screenshots taken.
- **Behavior Risks**: Interaction pattern signals, including time spent, context switches, copy/paste events, autofill events, and hesitation percentage.
Depending on your organization's configuration, the Risk tab may also include:
- Outputs from third-party risk providers.
- [Risk AI Agent](https://developer.incode.com/docs/risk-ai-agent) results. Risk AI Agent can run in shadow mode.
### Other
The Other tab shows supporting Session metadata. It includes the following sections:
- **Consents**: The consents presented to the user during the Session, shown as they appeared onscreen. Each entry includes the consent status and timestamp. If a user didn't accept a consent, the Session may still complete, but the consent appears as not signed. This depends on your [configuration](https://developer.incode.com/docs/configuration-consents-tab).
* **Event Log**: A chronological list of all events in the Session. Useful for debugging Flow and Workflow progress and confirming what executed.
{/* What format is Total Time here in? HH:MM:SS? */}
- **Device Details**: Device and network information, including device identifiers, OS, browser, SDK version, and IP location.
- **Device Risk**: An overall Device Risk result with available sub-checks, including device reputation, bot level, VPN/proxy detection, emulator detection, OS anomaly, mocked browser, remote software level, incognito mode, and screenshots taken.
- **Behavioral Risk**: An overall Behavioral Risk result with available sub-checks, including motion status, virtual camera detection, inspector opened, and ID/selfie stats analysis. Interaction signals such as time spent, context switches, copy/paste, and autofill events may also appear.
- **Other Documents:** Captured document artifacts from Document Capture or other document modules, when enabled for the Flow or Workflow.
- **Location**: Document and device location data.
- **Signatures**: Signature artifacts captured during the session. Drawn signatures appear as images. Checkbox signatures are shown as JSON web tokens (JWTs) you can store or share with your compliance or legal team.
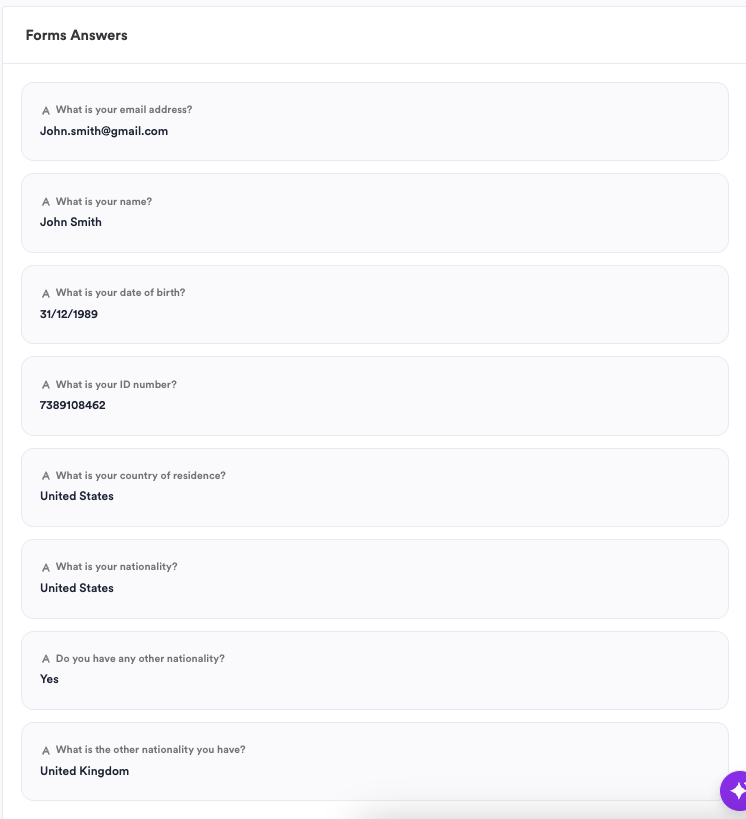
- **Forms Answers**: User input provided for the questions configured in the [Forms and Data Entry](https://developer.incode.com/docs/forms-and-data-entry) module.
***
## Add a Face to the Database
Add face to the database to create an [Incode Identity](https://developer.incode.com/docs/glossary#incode-identity) record for the user from the session's captured face and ID data. This enrolls the face in Dashboard so it can be referenced in future checks and generates a `FACE_ADDED_TO_DATABASE` event in **Compliance** > **Audit Logs**. The button appears when an identity record doesn't yet exist for the session.
1. Enter single Session view.
2. Click **Add Face to Database** at the top.
***
## Escalate a Session
Escalate a session when you need Incode's internal teams to review a problem tied to that session. Common reasons include false approvals or rejections, classification or OCR errors, and bugs or incorrect data shown in Dashboard.
1. Enter single Session view.
2. Click **Escalate** at the top.
3. In the Escalation dialog, select an **Escalation Reason** from the drop-down.
4. If the **Issues** drop-down appears, select the issue related to the escalation reason.
5. In **Comments**, enter details about why you're escalating this session.
6. Click **Open Escalation**.